GAPS Perpetual Soup

My mom and I were talking about last night’s soup(head on over to my IG profile to check it out, it’s a short video of my version of GAPS butternut squash soup) and how amazing it was. Literally, I just threw things together no big deal. At least not to me, and yet it was the yummiest concoction to date…according to her and dad. 🤷🏻‍♀️

After I put my short video up on IG with the recipe, which I made up on the fly, I was not expecting it to be so well received. That’s when our conversation took a bit of a turn and mom said it was so good she could eat it again tomorrow night. Well gang, that’s exactly what we’re going to do but with a twist!

See, living with a history buff you tend to learn a thing or two. I do so enjoy watching anything about how kitchen life was way back when. And tonight’s soup is paying homage to the Medieval pottage. Minus the lentils and starchy vegetables. It is, however, chock full of GAPS friendly vegetables, herbs, and seasonings and the best part is that the soup from the night before is lending it’s own layer of yummy flavors!

So what is a perpetual soup? In a nutshell…

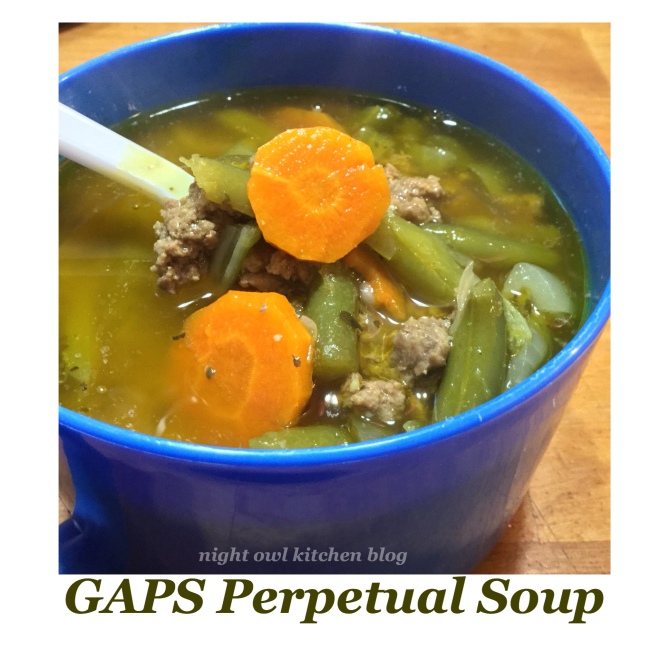
My pot is currently full to the brim after adding extra ground meat, onions, carrots, green beans, and okra. As it simmers away, I am already thinking about what I could possibly add tomorrow night to keep this incredible pottage going. Broccoli, cauliflower, frozen squash and zucchini, the possibilities are endless!

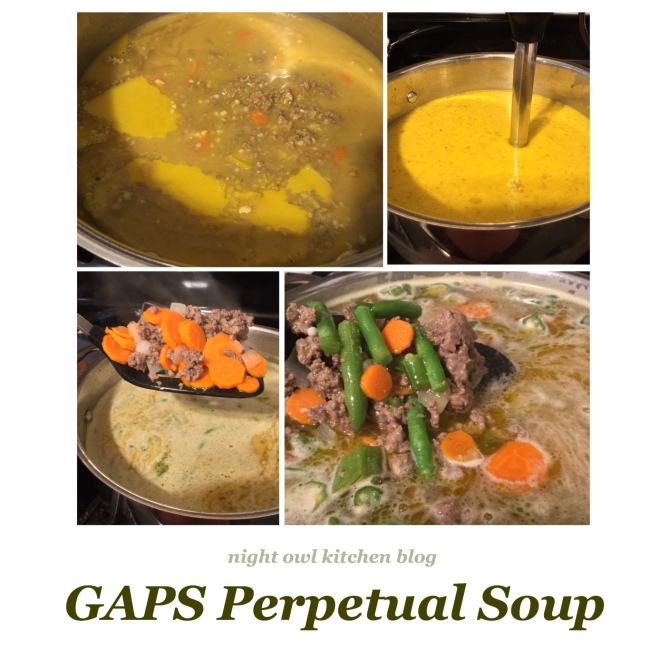
You can do this with any soup, you don’t have do exactly what I have in the photos. The beauty of this recipe is you can add whatever you have on hand, toss it in the pot and let it go. What I did is used an immersion blender(a.k.a. boat motor) and pureed the previous soup down before adding the extra meat and vegetables. It adds body to the soup and makes room for the extra goodness that you’re about to put in!

To last night’s butternut squash soup I added:

4 cups of extra liquid(beef broth)

2Lbs ground meat

1 onion

3 small sliced carrots

1 bag frozen green beans, break larger beans in half

1/2 c chopped okra

Seasoned with salt

1 tsp dried basil

1/2 tsp dried oregano

1/2 tsp sweet summer savory

I already have fresh ginger, a touch of cumin and nutmeg, some turmeric, and minced garlic in there from the night before.

Before pureeing down the previous soup, add the extra liquid. This will help from slowing down the process. Use short bursts to avoid splattering. 😬

I made sure to brown the meat with the onions and carrots first to jump start their cooking process. Added the frozen vegetables directly to my hot soup pot, followed by the salt and herbs. Let it simmer for 25 minutes and enjoy! Easy!

I encourage you to give it a try, GAPS soups don’t have to be boring. If you’re like me you tend to have maybe one or two servings from each batch you make. Puree so e of them down and create a brand new soup! I don’t think you’ll be disappointed!

Keto Pound Cake

Finally getting around to writing this recipe up. Been working on other projects for the Wednesday night class that I teach. We’re doing an ice cream theme this year and trying plan out and organize minute to win it age appropriate games is a lot harder than you think.

So let’s escape for a bit and talk about something yummy! Ready?!

Picture it, we’re lounging on a mild summer day, no mosquitoes exist, the humidity is low, and it’s not possible to get sunburned. Hey, you’re in my world so this is possible! 😉 And then a tall hunky man with gorgeous hair comes out with a large tray of strawberry lemonade, sugar free of course, and slices of keto pound cake ready for us to enjoy! Can ya dig it?? 😃

Oh right, the recipe…we’ll come back to the tall hunky waiter later!

What you’ll need:

(Yields 12 slices)

1 stick butter, room temp preferred

8oz cream cheese, room temp preferred

1 1/2 c keto sweetener(Swerve, Erythritol, Stevia, whichever you prefer)

8 large eggs

2 tsp lemon zest +1 tsp lemon juice

1 1/2 tsp vanilla extract

2 1/2 c super fine almond flour, I use Blue Diamond brand

1 1/2 tsp baking powder

Directions:

Set oven temp to 350*F. Prep a regular loaf pan with either non-stick foil, parchment paper, or coconut oil cooking spray. Set it aside.

In a large bowl add softened butter, cream cheese, and sweetener. If by chance your butter and cream cheese aren’t room temp just pop them in the microwave for 20-30 seconds. Cream the three together until it’s light and fluffy. Begin adding the eggs, two at a time and mix thoroughly. To this, add your lemon zest, lemon juice, and vanilla. (I was half tempted to use orange extract instead of vanilla, you can if you want to for a citrus pound cake). Finally add almond flour and baking powder, mix to combine.

Pour batter into prepared loaf pan, scraping contents out with silicone spatula. Bake for 60 minutes or until knife inserted in the center comes out clean.

Let it cool completely before adding the whipped cream cheese topping.

Whipped Cream Cheese Topping

8oz cream cheese, softened

1 tblsp lemon zest

2 tblsp lemon juice

1/4 c keto sweetener

2 tblsp heavy cream, optional

Directions:

Add all ingredients into a small bowl and combine thoroughly. Spread on top of the cooled pound cake and enjoy! Any leftover cream cheese topping can be used with toasted keto bagels.

And there you have it! You would think with it having 8 eggs it would be super eggy and spongy in texture. Thankfully it’s not, at least to me. The lemon zest helps to brighten up the pound cake, making it the perfect summer treat! You can serve this with some fresh strawberries and blueberries. You’ll get roughly 12 slices and if you’re serving this at a cookout or get together you can slice those 12 into 24 half slices.

For storing, cover with foil or plastic wrap and keep in the fridge. You can store this in the freezer as individual slices and leave out to thaw for a couple of hours. No need to microwave.

The carbs are high because I’m still trying to use up the granulated stevia I have. If you use erythritol/Swerve that will save you on carbs. Highly recommend using something other than the Great Value brand of stevia.

Macros:

Carbs: 11.3g(net)

Fat: 36.7g

Protein: 11.4

Hope you all enjoy and have a great week!

Keto Chocolate Pound Cake(Review)

It’s not too often that I find keto/low carb dessert recipes that meet my high standards. It’s difficult to please everyone and when it comes to desserts my family likes for the final results to resemble to real deal high carb version as much as possible. That’s not asking for too much, no not at all.

This is a home run recipe and one that I am very pleased to share with you all! The original recipe can be found here! I’m a lazy typer tonight and decided to not type up the entire name of the original recipe, so don’t go sideways on me about that, ok sugar? 😉

Most of you know I’m not a chocolate fan at all, so for me to be making this recipe and reviewing it is big stuff. So let’s dig in…

The recipe itself is easy to execute. The majority of low carb/keto folks have the following ingredients in their kitchen already:

  1. Almond flour
  2. Cocoa Powder
  3. Baker’s Chocolate
  4. Natural sweetener of choice(stevia, xylitol, swerve, erythritol, etc.)
  5. Eggs
  6. Heavy cream
  7. Leavening
  8. Cream cheese
  9. Butter

The only unusual item I had to get was a box of instant coffee. While this is an optional ingredient, I do highly recommend adding it in. It does lend a lovely layer of flavor to this rich cake and isn’t overpowering at all. I used Folgers instant crystals, simply because a) I’m cheap(a box of 7 packets was a buck) and b) I already know what Folgers coffee tastes like. My advice, stick with one you’re familiar with. I used two packets which perfectly measured out to 2 teaspoons. However, if you have never had instant coffee before and are unsure about it or you detest coffee all together(btw, we can’t be friends if you detest coffee…just kidding😜) you can easily leave it out, no big deal.

I found it a tad odd that the recipe only called for 7oz of cream cheese. I’ve used that amount before but only after using the other ounce in a different recipe. No biggie. But since I didn’t relish the idea of storing a single ounce of cream cheese in the fridge and wasn’t hungry enough to nosh on it I went ahead and added all 8oz into my batter. Might as well, the extra ounce didn’t alter the final result in a major way at all. If anything, the pound cake is light, moist, and with a faint crumb texture. For me, I will always add the full brick of cream cheese, no sense in being too particular. But hey, you do you!

I know I’ve answered a lot of questions about almond flour in keto groups and in DMs. What brand to use, substitutions, etc. this recipe specifically uses almond flour. I know it’s an expensive ingredient and I wish I could tell you to go ahead with another alternative but honestly I cannot. If you absolutely NEED to make this recipe I highly suggest Blue Diamond Almond Flour. It’s finely sifted and for 1/4c serving it has 2g net carbs. I had been a Bob’s Red Mill Super Fine Almond Flour user but I prefer the finer texture of the Blue Diamond brand. Bob’s Red Mill Super Fine Almond Flour has 4g net carbs per 1/4c serving. I’m not sure how these companies figure out the carbs when both only contain blanched almonds and nothing else. But since Blue Diamond has fewer carbs per quarter cup then that’s what I’m going to go with from now on.

Next, don’t let the amount of eggs in this recipe scare you off. I know 8 eggs is a lot and you would think the outcome would be super eggy and sound like you’re biting into a wet sponge, but it’s actually not. Just make sure to use large eggs, not extra large, jumbo, or regular. Just large eggs, I’m an Eggland’s Best Kind of gal. If you have fresh eggs then go with that. I made the mistake in buying extra large without realizing it, I probably could have gone ahead used 4 eggs and said a prayer, but I’m a stickler when it comes to my baking. Unless I know for sure that my substitution isn’t going to ruin the recipe, I rarely ever go off roading with my baking. There’s an exact science when you bake, all ingredients need to be properly measured and/or weighed(when specified) to ensure that your baked good is going to turn out right. Thankfully my dad brought home large eggs and all was right again in my little world! 💗🌏💗

I did not make two loaf pans worth as the original recipe states. To save my own sanity and dishes I went with a disposable half size aluminum steam pan from Sam’s Club. You get 36 pans usually for a little over $8. Not bad and I use them for everything! Low carb brownies, casseroles, pork rind coating for chicken, and vegetable sides. Clean up afterwards is a cinch, just pitch it or recycle…whatever floats your boat. If you don’t want to use those pans you can certainly use a 9×13. Just make sure to grease your pan well before adding the batter. I used Pompeiian Coconut Oil Spray, get mine from Walmart and I’ve had great results every time I use it! Used about 5-7 sprays and no need to coat the pan with cocoa powder or almond flour, each slice of cake has come out perfectly! You could also turn these into muffins and then drizzle the chocolate ganache over the top, just a thought.

And finally, since I didn’t bake this into loaves I decided to adjust the baking time. For the loaves you would have to bake at 325 degrees for 70-90 minutes to ensure even baking. In a 9×13 pan leave the temp at 325 degrees and set your timer for 30 minutes. I used a clean knife to check the center twice, both times the knife came out clean. Let it cool completely before you add the chocolate ganache. Store it covered and enjoy!

Honestly this is a yummy recipe, I hope my review has helped and no hindered. If you have any questions please feel free to ask! Hope you all enjoy the rest of your weekend!

Keto Eggplant Parmesan

I have been making eggplant parmesan for 18 yrs now. I discovered a recipe in a Southern Living cookbook and taught myself how to execute it. This is not a meal that that I grew up on. My mom is not an eggplant fan, let alone eggplant parmesan. Her experience with eggplant parmesan has always been watery casseroles with thick slices, so when I decided to give it a try she was not excited.

The original recipe calls for a cracker coating with flour and seasoning(which is what makes regular eggplant parmesan the bomb), egg and heavy cream, sauce either homemade or jarred, and mozzarella cheese. A handy tip in the sidebar was to salt the eggplant slices and let sit for 20 minutes to remove the bitterness.

It’s also a recipe that you absolutely have to plan for. You can prep ahead and fry up the eggplant slices, freeze them, and when you’re ready to make your casserole just thaw out the slices, get your sauce ready and assemble. Normally when I make this recipe, from start to finish, it takes me 3hrs. Sometimes longer depending on how much eggplant I have to use up.

So, for this keto version I decided to use pork rinds mixed with parmesan cheese, and a little almond flour. I’ll admit that I was concerned about the coating adhering properly. Eggplant isn’t chicken, but after adding the first few slices to the hot oil I could see that the underside was browning quite beautifully! Enough gabbing, here goes…

What you’ll need:

Yields: 10 servings

2 medium eggplant or 1 large, peeled and thinly sliced

Kosher salt

1 pound ground beef, 80/20

6 sausage patties, optional

1 onion, diced

24.5 oz Mezzetta Nappa Valley Homemade Sauce Marinara

13 oz pork rinds, finely ground

1 1/2 c Kraft Parmesan cheese

1/2 c super fine almond flour

1 tsp dried basil

1 tsp granulated garlic

5 large eggs, whisked

16oz Galbani Fresh Mozzarella

Directions:

(The following directions are going to be broken down in sections. If you have any questions please feel free to ask for clarification.)

Eggplant:

Peel and thinly slice eggplant. Salt both sides and layer in a large bowl. Set aside for 20 minutes.

Meaty Sauce:

In a large pan brown ground beef and sausage, adding onions and cooking until transparent. Pour in marinara sauce and let simmer for 10 minutes to blend flavors. Remove from heat and set aside.

Pork Rind Coating:

In a food processor, mine is 7qt, add pork rinds and grind down into a fine (oily) dust. This took me about three batches to do. Pour contents into a large bowl and add parmesan cheese, almond flour, granulated garlic, and dried basil. Mix either with a fork or hand breaking up almond flour and parm cheese lumps. Set aside.

Rinse eggplant slices thoroughly under cool water and place on layers of paper towels. A sheet pan some in handy since it offers more surface to place the rinsed slices.

Egg and Heavy Cream Wash:

Whisk eggs together and then add the heavy cream. This way you can make sure the whites get mixed in thoroughly before adding the heavy cream.

Frying Eggplant:

In a large skillet heat up favorite frying oil. Set up dredge station for ease of process. Begin by adding eggplant slices into egg wash and then into pork rind coating. Shake off excess and add to hot oil. Fry until nicely browned on both sides. Continue this process until all the eggplant is cooked.

Assembling Casserole:

Set oven to 375°F and grab a 9×13 casserole dish. No need to spray your pan if it’s nonstick. Thinly slice fresh mozzarella and set aside.

Add 1/3 of your meaty sauce in the bottom of the pan. Spread out evenly. Cover with half of the fried eggplant, 1/2 of fresh mozzarella slices, and repeat ending with fresh mozzarella on top. Cover with foil and bake for 40 minutes. Remove foil, bake for an additional 10 minutes (if desired) until hot all the way through and bubbly around the edges.

Let sit for a few minutes before serving.

This was a huge success tonight! Tasted as good as ever and you absolutely cannot tell that any pork rinds were used. It’s worth the time it took and leftovers are amazing the next day as the flavors have had a chance to blend. You can make this 100% vegetarian by leaving out the meat, using cassava flour for the coating and substituting the cheese if needed.

Of course, fried eggplant slices are great alone. Serve them up with mashed cauliflower, a meatloaf, baked chicken thighs, etc. You can also use them to make a deconstructed eggplant parmesan. Plate it up with you favorite sauce, top with fresh parmesan cheese, and maybe some roasted vegetables on the side.

Hope you all enjoy!

Keto Sausage Balls

I am a hard sell when it comes to sausage balls. Bisquick sausage balls are yummy but tend to be hard and dry. Not sure too much mix is used or if certain folks over work the mixture. Normally I make my homemade version around Christmas time, including a from scratch dry mix to add to the raw sausage. It’s a thousand times better and I always wind up with tender tasty sausage balls.

So when I came across keto sausage balls on Pinterest I didn’t have too much in the way of high hopes. A lot of reviewers kept complaining about their sausage balls flattening out, being too dry, not holding together. You can see why I was hesitant to try anything. After reading through several different recipes, and their tips, I decided to wing it! 🧚🏼‍♀️

What you’ll need:

Yields: 79 sausage balls

2Lbs Tennessee Pride Bulk Sausage

4 c Member’s Mark shredded mild cheddar

2 c Bob’s Red Mill Super-Fine Almond Flour

1/2 c organic coconut flour

4 Tblsp Daisy sour cream

1/2 tsp baking powder

1 tsp Tone’s granulated garlic

Directions:

Set oven to 400 degrees and line two half sheet pans with either nonstick foil or parchment paper. Set aside.

In a large metal mixing bowl add all the ingredients and mix thoroughly. You can free form the balls, which I did, or you can use a slightly rounded tablespoon scoop. Portion out the meat mixture, I was able to fit 35 to each pan with 9 extra on a smaller pan that I baked in my toaster oven.

Bake each pan for 18 minutes or until golden brown and slightly puffed. Even though I used nonstick foil I still had some sticking but nothing major. Just let them cool to a point where you can gently pry them off.

You can easily reduce this recipe if you’d rather not make a lot and if you don’t have the exact ingredients for this recipe that’s ok. Use what you can adjust the macros accordingly. I just want to share with you what I used.

These were absolutely perfect and great for any time! Dinner, lunch, snack, quick breakfast, post workout, and party finger foods. I could easily eat half a pan but thankfully they are self limiting and I wasn’t able to eat more than ten. From here on out this is going to be my go to recipe and I hope it becomes yours too!

Happy cooking and have a great weekend!

Keto Baked Parmesan Chicken

Baked parmesan chicken is a family favorite. All that garlic, crunchy coating and we often paired it with mashed potatoes and corn. It’s been difficult to find a lower carb friendly version that would mimic the same results. Tonight I finally did it! Finger lickin’ good!

This keto version is something I threw together hoping and praying would work. After all, the keto fried chicken was a success so I held out all kinds of hope for this as well. The results speaks for itself…crispy and not soggy at all. As for making this dairy free, I am not in know about parmesan alternatives. All I can say is play around and see what works for you. 🤷🏻‍♀️

What you’ll need:

4 large chicken breasts, thawed and sliced into 26 strips

13oz pork rinds, ground

1 1/4 c Bob’s Red Mill Super Fine Almond Flour

1 c Kraft Parmesan Cheese

1 tsp dried sweet basil

1 1/2 c + 4 tblsp salted butter

1/4 – 1/3 c minced garlic(feel free to use less)

Directions:

Set oven to 375 degrees. Prep two half sheet pans with non-stick foil and set aside.

Slice large chicken breasts in half length wise and filet each half. (Somehow I managed to get 26 pieces without trying.) Cover and set aside.

For the coating, add pork rinds into a food processor and whiz down into fine crumbs. Add to a bowl or disposable roasting pan. (I had to do this in three batches.) To this add almond flour, parmesan cheese, and basil. Combine thoroughly.

In a 1.5qt sauce pan over medium heat melt butter and add garlic; reduce temp to low. Set up your assembly line: Chicken, garlic butter, coating, and pans. Using forks, dip chicken into garlic butter and dredge in coating. Place on sheet pan and repeat until all chicken is coated.

BUT WAIT!

Spread the rest of the coating evenly over the chicken and drizzle the remaining garlic butter over the chicken. Ohhhhhh yeah! Bake for 40-45 minute until golden brown.

Have. Mercy!

This is every bit as good as our high carb version, if not better! Pair it with mashed cauliflower and your favorite vegetable side. This is picky eater approved too!

Have a blessed weekend!

Low Carb Creamy Sausage Soup

Tonight I decided to revamp a delicious soup that was unfortunately too high in carbs. Managed to get from 15g net down to 7g net and didn’t sacrifice any of the flavor!

This is a soup my mom wants me to make again, even my picky eater loved it! Helped that I added almost an extra pound of sausage. Extra meaty goodness is never a bad thing. 😉

What you’ll need:

Yields: 14 servings

2 tblsp avocado oil, Chosen Foods brand

2 pounds bulk sausage(I used one hot and one mild of Tennessee Pride)

22 sausage patties(Rudy’s Farm, my addition)

1 large onion, chopped

2 medium carrots, chopped

3 large celery stalks, chopped

1/4 c minced garlic

7oz cream cheese(my addition)*

32oz box beef broth(Swanson’s No Salt Added)

2 c heavy cream

1 c Parmesan cheese(I used Kraft Original)

__________________________________________________________

Optional Ingredients Original to Recipe

8oz cremini mushrooms, sliced(for the soup)

1 tblsp Italian Seasoning(for the soup)

1/2 finely diced onion(for the meatballs)

1 celery stalk, finely diced(for the meatballs)

1 egg(for the meatballs)

Directions:

In a large soup pot add cooking oil, sausage, and vegetables. Cook the meat down till it’s no longer pink and the vegetables are tender. Add the minced garlic and let cook for a minute before adding the cream cheese. Do not stir the cream cheese in. Place it on top of the meat mixture, slap a lid on it and let the heat soften it for a few minutes.

Stir the softened cream cheese into the meat thoroughly, add beef broth and heavy cream. Bring soup temp back up and add parmesan cheese. Let cook for a few minutes to allow parmesan cheese to the soup. Serve hot.

*I know 7oz of cream cheese is an odd amount but I had it leftover from a previous recipe. Feel free to add a full 8oz or leave it out completely. It’s not original to the recipe but it doesn’t harm the recipe at all. In fact, the Carb Manager app I use has ranked this soup recipe as Grade A, meaning it’s safe to enjoy! But not everyone likes cream cheese and that’s ok. 👍🏼

Now, for the option of making meatballs:

2 pounds bulk sausage(minus the extra 22 patties)

1/2 c finely diced onion

1 celery stalk, finely diced

1 egg

Mix it all together and portion out into meatballs. Brown in a skillet on all sides; move to a plate while you put the soup together. Add towards the end and enjoy!

You’ll want to add the mushrooms to the soup along with the onions, carrots, and celery. I left this out simply because I’m not a huge fan of mushrooms any more and saved myself some carbs in the process.

As for the Italian seasoning, I left this as optional simply because I didn’t have any to add tonight. We tend to keep a homemade version on hand. It’s part of the original recipe but honestly I don’t think it needs it. I liked it without since the sausage lends so much flavor anyway. But I leave that up to you to decide.

__________________________________________________________________________________________

Hope you all enjoy my lazy version! 😉 It came together quickly in about 30 minutes, and leaving out the step to make meatballs was for the best since I really wasn’t in the mood to cook. Garfield is my spirit animal this week as I approach my weigh in day. I’m just thankful that my scales can’t talk to me. That joker would not live long if it did. 😏

Hehe, enjoy your week! 😜

Keto Cheesy Shrimp Cakes

My family was leery when I told them what was for dinner. “Shrimp cakes? That’s weird.” I’m trying to get them to try new things and thankfully this was a success! It’s not dairy free, but it could be made that way if you so choose. I can’t guarantee the same results as you’ll see below, but play with it till you are able to get the right consistency.

Onward!

This is one of those easy recipes that comes together fairly quickly. I thoroughly enjoyed them on lettuce leaves with my homemade lemony tartar sauce(which I will include the recipe below).

What you’ll need:

Yields: 18 patties

2 pound raw medium shrimp, peeled, deveined, thawed

3 extra large eggs

1 tsp Old Bay Seasoning

1 Tblsp dried parsley

1 tsp black pepper

1 tap granulated garlic

3/4 c super fine almond flour

Directions:

Begin by mincing the shrimp. You can either do this by hand or with a food processor.

Add minced shrimp to a large bowl and mix in the other ingredients. In a large skillet over medium high heat add you favorite cooking oil. I used avocado oil and 3 tablespoons of organic butter.

Use a 1/4 cup to measure out portions, flatten slightly in the pan and fry until golden brown on both sides.

Lemony Tartar Sauce

1 1/2 c full fat mayonnaise

2 tblsp pickle relish, dill or other preference

1 tsp granulated garlic

1/2 tsp Old Bay Seasoning

2 tsp dried parsley

2 tblsp lemon juice

1/8 tsp dried lemon zest

Directions:

Combine all the ingredients in a bowl and enjoy!

Nutritional Info for 1 Shrimp Cake (according to MyFitnessPal):

Calories: 113

Fat: 6g

Carbs: 1.3g

Fiber: 0.6g

Net Carbs: 0.7g

The nutritional information for the Lemony Tartar Sauce will be determined by what kind of relish you use. I chose to go with Wickle’s Relish, this would have more than say dill relish. Just make sure you mayonnaise is sugar free, that’s why homemade is best! You can leave the sugar out and use your favorite sweetener. ☺️

I’m just happy the cheesy shrimp cakes were a hit! It shocked everyone and even the lemony tartar sauce became a tasty favorite as well! The dried lemon zest can pack a punch so use sparingly. Fresh can be used instead if you prefer, even fresh lemon juice can be used in lieu of bottled.

🔥Want to spice it up? Add some kick from a little cayenne pepper or red pepper flakes. Start with 1/8 tsp and add more until you reach a desired heat level. Remember: you can always add more but not take away.

Have a great weekend!

Btw, happy birthday to all the March babies🎉 May you all have a blessed month!

Keto Fried Chicken

I decided to give pork rinds another shot for fried chicken and fully expected a soggy wreck in my fry pan. Before starting, I wanted to make sure that my oil was hot and my heavy cream to eggs ration was in favor of the eggs. Viva la eggs! 😬

I also decided to not use someone else’s recipe, even after going over dozens of great looking recipes this past weekend. In the end I decided to keep it simple with just a few ingredients and crossed my fingers for luck!

You can decide what seasonings you want to use. Since this is not a dairy free recipe, because I used parmesan cheese in the coating, the salt was omitted.

What you’ll need:

2-3 pounds of thawed boneless, skinless chicken(this is what I used, you can use bone in and with skin…you do you)

14 oz pork rinds, finely ground

3 extra large eggs + 4 egg yolks(the extra egg yolks are optional but they did come in handy)

1/2 c heavy cream

2 Tblsp dried parsley

1 tblsp Spanish Paprika

1 1/2 c parmesan cheese(powdery version from Kraft)

Oil or lard for frying

Directions:

In large fry skillet add enough oil or lard for frying and begin to heat it up.

Fill up your food processor(or blender) and grind down the pork rinds into a fine texture. This may take two to three rounds. Be sure to remove the hard bits that refuse to break down. Pour into your dredge pan until your pork rind container is almost empty. Add parmesan cheese, your seasonings of choice, and combine.

Whisk together eggs and add heavy cream.

Filet thawed chicken into desired portions. I personally like to filet halved chicken breasts. Place pieces into a colander lined glass bowl(basically place a metal colander in a glass bowl. This will help to keep the chicken from sitting in it’s own juice.)

Once oil is hot, add some chicken to the egg wash letting the excess drip off and place in the pork rind coating. Using your hands coat the chicken making sure to press the coating into the chicken. Add no more than four to five pieces into your hot oil. Keeping the center open. Fry till golden brown on both sides. Repeat till all the chicken is cooked up.

Place finished pieces on a plate and serve with your favorite mayonnaise base sauce, veggies, salad, etc.

Nutritional Info(according to MyFitnessPal)

Yields 38 pieces

Calories: 98

Fat: 7.2g

Carbs: 0.3g

Fiber: 0.1g

Net Carbs: 0.2g

The coating stayed on, crisped up nicely, and the chicken was still tender and juicy! Served it up country style green beans and my homemade remoulade sauce. It’s definitely a keeper! Hope you enjoy.

(If you have any questions, please feel free to ask.)

Single During Valentine’s Day, It Could Be Worse!

It’s that time of the year when couples are finalizing their plans for the next evening. Making sure the dinner reservations are in place, flowers are purchased, candy and card is set to receive…maybe some jewelry for those who are lucky. 💍👍🏼

It’s fine and all, I’m not anti-Valentine’s Day at all. Just because I’m as single as a Pringle doesn’t mean that I hate everything that this particular holiday stands for. And I know I don’t go crazy posting all kinds of ideas for gifts, desserts, decorations, etc. I guess I’m just not that kind of person. I’ve been blessed with witnessing what real love is like. It goes beyond flowers, candy, cards, and jewelry. It’s been see what 46 yrs of trying not to kill each other looks like! 😏 That’s a joke, seriously…my folks will most likely see this so I’m joking! Love you both! 💘

I could pretend to be all wrapped up in this holiday like every other blogger out there, that just isn’t my style. Don’t get me wrong I love planning out all kinds of stuff for kids, in fact I’ve been busy for a few weeks now doing just that. Had to push the party back by another week since so many have been out sick lately, which gives me some extra time to get my ducks in a row. But when it comes to adults, I can’t help but withdraw.

Again, nothing against this holiday at all. I’m just a practical romantic when it comes to down to it. No need to get all glitzy, frilly, or expensive.

Honestly, I am all for that kind of date night! 👆🏼True, it’s been 16 yrs since I’ve dated…and believe me that was as painful to admit as it was to read, but like the title says “it could be worse.” Which it honestly it could be. There are worse things than being single on Valentine’s Day. How about…

  1. Being in a bad relationship with someone who doesn’t truly love you.
  2. Getting beat up all the time.
  3. Not knowing if you’re going to wake up the next day or not.
  4. Dying of injuries from blunt force trauma.
  • See where I’m going? Grim, extreme, but not all too far from what I’ve experienced in my past. Except number four, obviously escaped that one. 👍🏼
  • All right, so I won’t get to dress up and go out with a handsome fella on a special night out to our favorite restaurant. I won’t get flowers, candy, or a card like everyone else.
  • Nope. I get something way better. I get to stay home, sans makeup, wearing my comfy pj’s, eating yummy “good for me” food, and watching hilarious tv shows with my family. I also get to snuggle up with my precious fur-baby, Spot, and not have to worry about if my spanx are cutting off the circulation to my girly bits. 😬 (Ok, forget that last part…)
  • I guess if the Lord ever blessed me with another relationship I’d like to think that He’d pair me up with someone who was thoughtful, sweet, and showed me everyday just how much he loved me! Valentine’s Day is nice, but there are 364 other days in the year to show that special someone just how much you love them. Am I right?!
  • NOK Bone Toss: all right, I’m gonna toss ya bone. Below are links to my go-to recipes for my family. We have:
  • 1) Holy Cow! LC/GF Brownies these are a huge hit and I’m making them for Thursday. They are the most requested by all and I have even been able to fool non-low carbers with them! Yes, these brownies are that awesome!!
  • 2) LC New York Style Cheesecake plus here’s my original post reviewing this recipe.
  • 3) LC/GF Chocolate Cake with Buttercream Frosting it’s as good as it sounds, very rich! Can also be made in a 9×13 if you’d rather not make it in layers.
  • I sincerely do hope you all have a wonderful Valentine’s Day, stay safe, and have fun!
  • (Seriously, the only box of chocolates I truly care about! I’m a big ol’ softy when it comes to labs! Even the dark chocolate variety.)