Vegetable Beef Soup

It’s been a chilly day, you get home and all you want to do is get the fireplace going and enjoy a bowl of hot soup and melt away the damp chill that has consumed you. 

With all the rain we’ve been having and now the cold has moved in, all I wanted was to feel warm and cozy again. Inspiration hit me whilst looking up recipes for an up and coming Christmas party I’m throwing with a couple of my friends for some very special kids. While scrolling, I saw a recipe for beef  soup, which called for stew beef(not a fan of). Remembering that we had a package of ground beef in the fridge I decided to make a soup from my childhood! Mom would make vegetable beef soup with ground beef and after living in Brazil we switched over to a vegetable chicken soup. Whichis absolutely scrumptious, but tonight’s soup brought back so many wonderful memories! After letting it simmer for 20 minutes I felt like a little girl again. Flavor train had pulled in and I was totally on board!! 


Vegetable Beef Soup

2 Lbs ground beef, cooked, drained

1 large onion, chopped

3 garlic cloves, minced

3 tsp beef bouillon granules

1 1/2 tap kosher salt

1 tsp black pepper

1/2 tsp dried basil

2 bay leaves

2 cans of diced tomatoes

2 cans beef broth or stock

1 10 punce package frozen mixed vegetables(I used Asian mixed veggies)

1 can yellow corn, drained

1 cup filtered water, optional

In a large dutch oven pot over med/high heat, brown ground beef with onions and garlic. Drain fat if desired. Stir in beef bouillon granules, kosher salt, pepper, dried basil, and bay leaves. Pour in beef broth/stock, frozen vegetables, diced tomatoes and drained corn. Stir and reduce temperature till soup is just simmering, cover for 20 minutes. Adjust seasonings if needed and add water if too thick. Serve with your favorite salad, crackers, cornbread, or dinner rolls. 

This recipe will easily serve 8–10, perhaps more if you choose to serve 1-cup servings. This soup will also freeze well and will make enough for another meal. Which is great on a night when you don’t want to cook but want a quick meal!  G–Man is not a vegetable fan, he did enjoy the broth and bits of meat, making sure to eat around pieces of tomato and pepper of course. He even went back for seconds! Being able share this dish with my son makes it even more special and perhaps one day he’ll get his aversion to vegetables! 😉 

Hope you all enjoy this soup, stay warm and have a blessed evening! 

December Already?!

8a7cfae9594d39d0c2127e7ad0c65eaa

Hard to believe it’s finally here, anyone else NOT ready?!

Alrighty, I am quite literally stealing away time to write and share this post with you all today. It’s a couple of days overdue and I know I’ve gone a lot longer without posting anything at all(for that I hope you can all forgive me). I trust everyone had a wonderful Thanksgiving! We had a nice quiet and simple Thanksgiving. I did manage to post a picture on my @nok_amandagayle Instagram account of our Thanksgiving meal. We tried a different method of cooking the turkey this year. Normally my Mom stuffs the turkey with vegetables and places it all in a roasting bag. But this year I wanted to try something new…well, new for us. We spatchcocked the turkey, not as easy as I read it would be, turkeys have a decent backbone that has to be removed. Had to get my Dad in there to help me press down on either side of the breastbone! I do think though, if we ever did this again there are a couple of difference things I do. But it did have a wonderful flavor and the skin was nice and crisp(my favorite)!

12312459_10153705561679014_84312350_n

Happy Thanksgiving Feast

We decided to keep things a bit more rustic. We served our spatchcocked turkey with country style green beans, smooshy potatoes, Mom’s homemade yeast rolls, and homemade cranberry sauce on the side for those who wanted it. The meal was quite tasty and we were all left feeling pleasantly full instead of overstuffed. 

12305602_10153705564174014_1386322110_n     12312315_10153705561774014_1412667874_n

12319800_10153705564164014_785312933_n

Even the bird was a beauty! Juicy and tender! The garlic herb butter added a deliciousness to it that I think I’m going to add to some other poultry recipes in the future.

There were a bunch of post holiday links for recipes on what to do with leftover turkey. I was actually hoping to get out of cooking on last Friday but the family didn’t want to eat more leftovers. So, I took a recipe I had glanced over, tweaked it, and added turkey! My Dad was impressed and wants me to make it again soon hehe!!!

12305468_10153705596334014_1564038640_n

Cheesy Hash Brown and Turkey Soup

1 onion, chopped
2 Tblsp butter
healthy pinch of kosher salt, for sweating the onions
3 garlic cloves, minced
32 ounces chicken broth or stock
2 cans cream of chicken and mushroom soup
1 1/2 cups chopped leftover turkey
1 30 ounce bag frozen hash brown shreds
1 pound Velveeta processed cheese, cubed
2 cups heavy cream or half n half
black pepper to taste
pinch of red pepper flakes

In a large dutch oven pot, melt butter and saute onions with salt. Cook till transparent, add in minced garlic and cook for 30 seconds covered. Pour in chicken broth, canned soups, and leftover turkey. Bring up to a boil and then add the hash brown shreds. Press them down gently and bring back up to a gentle boil for 10 minutes. Reduce temp to medium, gently stirring in cream chicken and mushroom soups, Velveeta, and cream. You don’t want to turn the shreds into mashed potatoes. Re-season with salt, pepper and a pinch of red pepper flakes. Let this simmer for 10 minutes until the Velveeta is completely incorporated. Serve with your favorite crackers or croutons, and salad.

It’s just one of those soups that’s perfect on a chilly night. It’s thick, cheesy, creamy, with a hint of spice. Which you can completely omit if you prefer. It serves about 8–10, so don’t worry if you have a lot of leftovers. It freezes and reheats up well!


Cookies~n~Cream “Ice Cream” Dessert

As my family has informed me, I’m not making true ice cream. Apparently I’m making a frozen dessert. This is why I am now putting “ice cream” in quotes. Either way, it’s the best frozen dessert I’ve had in a LONG time!!!

From the time the flavor was invented, I have been a fan. I love adding things to ice cream, cookies, brownies, and BACON! That’s next on my list, mark my words 😉 So instead of spending five bucks on a small carton of ice cream, I’d much rather buy the few, and I mean three ingredients, that make up this awesome frozen dessert!

11830716_10153455807959014_1068942680_n

Cookies~n~Cream “Ice Cream”

20 Oreo cookies, crushed
2 cups heavy cream, whipped
14 oz sweetened condensed milk
1 tsp vanilla extract, optional

Either in a gallon size bag or a food processor, crush the cookies. Don’t pulverize them into a dust! I did mine in a food processor and still had nearly five whole cookies that I then crushed in my hand. Set aside. 
In a large bowl begin whipping the heavy cream into stiff peaks. Set this aside.
Grab a medium bowl and stir together the sweetened condensed milk with about 3/4 of the crushed Oreo cookies. At this point you can add the vanilla extract. I played with it and while it’s yummy I think I’ll skip it all together.
Now begin folding the whipped cream into the cookie mixture. Pour the thickened mixture into a loaf pan and sprinkle with some of the leftover cookie crumbs. Whatever is left can be added to the frozen desert before serving!
Cover with plastic wrap and freeze for 4 hours or overnight. Serve with your favorite chocolate sauce.

11816036_10153455808064014_594913843_n

Cookies~n~Cream with plastic wrap

This is my new favorite, G–Man certainly enjoyed it 😉 But now he’s wanting Moose Tracks…oh dear, I’ve created a monster!!! The possibilities are endless, stay tuned for yet another frozen desert(and this one will be a doozy)!

Have a blessed day!

Trip Down Memory Lane…

I know each of us could take a turn and share a fond July 4th memory. Some might be more recent than others, for me I have to step on to the “Way Back” machine and pull this one from my childhood. 🙂

I have a couple of distinct memories of homemade ice cream at my Memaw and Papaw’s house in Florida. Yes, the handcranked kind! I remember this so vividly because I had no memory at any other time of watch the men on my Mom’s side of the family(and my Dad included) handcranking ice cream. And you talk about that being some of the best ice cream ever!! I have been a strawberry fan for ages, and Memaw made strawberry ice cream that will forever out do any current brand out there. The peach was amazinf too, with bits of peaches…nothing else has ever or will ever compare. 

July 4th this year, I kind of had an idea for a dessert, sorry to say it was NOT low carb, gluten free, dairy free or healthy. Yeah, all kinds of rules were broken for this weekend. But I refuse to beat myself up over it, it is what it is and tomorrow I am back on schedule! 😉 so….oh yes, the dessert…well, forgive me for what I am about to share…


Pure. Heaven. Talk about my childhood flooding back! The peach pie bars were more like a cakey cobbler, I’m not complaining at all about that. I would rather they be a little on the moist side than dry, crumbly and hard. Before I get into that recipe, I just have to rave about that ice cream. Holy creamy goodness Batman!!!! No joke, and I made that!! It was the easiest(yes I had my doubts at first) and it is so much better than the $5 stuff from the store. The recipe for Butter Pecan Ice Cream can be found on the inside label of the Eagle Brand Sweetened Condensed Milk. 

My Mom, who is a long time butter pecan ice cream connoisseur, absolutely LOVES this version! Her words, “the best yet! I want that for my birthday!” My Dad even said it tasted like the real deal, well that’s good to know that it doesn’t taste fake! Lol I love him 🙂 The only thing I did different from the recipe on the label was instead of using maple syrup, I used some of our homemade vanilla extract. It was by personal request from my Mom and it worked out perfectly! 

The vanilla ice cream, was just that…simple and creamy. Just three ingredients, insane right?! 

3–Ingredient Vanilla Ice Cream

2 cups heavy whipping cream

1 can Eagle Brand Sweetened Condensed Milk

1 tsp vanilla extract

In medium size bowl, whip together the heavy whipping cream and vanilla extract until firm peaks form. In another medium bowl add the condensed milk, begin folding gently the whipped cream into it. Add the mixture into a 9×5 loaf pan and press a piece of wax paper. This will help keep ice crystals from forming on the surface. Let freeze for 4 hours to overnight. Serve and enjoy! 

It doesn’t get any easier than that! No rock salt needed, no bags, massive amounts of ice, newpapers, ice cream balls, or machines. In about 5 minutes I had everything mixed and in the freezer. After that it was all up to the freezer and I was able to go about my day. G-Man is already wanting me to make chocolate ice cream, I’m thinking homemade moose tracks are in order 😉 

As for the Peach Pie Bars/Cobbler? Oy…That will be for tomorrow’s post. Hehe, even those are amazing all on their own! 

Have a blessed day!! 

Lime Chicken Fajita Salad (LC)

Evening everyone! Longtime no post, I know. Kind of hard to post anything when you get stuck in a rut with your food and don’t try anything new! I have not been diggin’ this summer heat, something about summer that begs for cooler recipes. If I can help it, I prefer not firing up the stove during this time of the year. Just makes sense, it’s too hot to cook. 

 
 Tonight’s dinner required a little stove top usage, but if the mosquitoes don’t like your blood and you can stand the heat then go ahead and fire up that grill!!! 😉 

Lime Chicken Fajita Salad

1 pound chicken, cut into strips

1/2 cup lime juice and zest from 1 lime

1/4 cup oil

2 TBLSP homemade fajita seasoning mix(down below)

2 large green bell peppers, chopped

4 each of mini yellow, red, and orange sweet peppers, chopped

2 medium onions, chopped

1 can diced tomatoes, drained

Salad of choice


Homemade Fajita Seasoning

2 tsp chili powder

1 tsp kosher salt

1 tsp spanish paprika

1 tsp stevia in the raw

1/2 tsp onion powder

1/2 tsp garlic powder

1/4 tsp cayenne powder

1/2 tsp cumin(or less)

This recipe yields 3 tablespoons of seasoning. Just mix in a bowl and use as desired. 


In a gallon sized bag, add chicken, lime juice, lime zest, oil and fajita seasoning. Zip shut and let it marinate for four hours or all day. Pan cook the chicken on the stove top or grill. Let chicken rest. Chop up the peppers and onions. Season with a little salt if desired. Veggies should be fork tender. Just before serving, pour in drained diced tomatoes and give a quick stir. 

To assemble: spoon peppers and onions over salad and top with chicken. The juice from the peppers and onions will act like a warm dressing. You can garnish with sour cream, guacamole, and favorite salsa. I kept mine simple, but I think this is my new favorite salad! It’s light, fresh and I added a little extra lime juice to my salad and chicken. Super delicious! 

This can also be  enjoyed on warm flour wraps, but only for those who don’t have issues with gluten or carbs. 

Nutritional Information for Salad:

Calories: 157

Fat: 2.1 g

Carbohydrates: 11g 

Dietary Fiber: 1g

Net Carbs: 10g 

Nutritional Information for Seasoning:

Calories: 12

Carbohydrates: 2.2g

Dietary Fiber: 1.1g 

Net Carbs: 1.1g 


HOPE YOU ALL ENJOY AND HAVE BLESSED DAY! 

Lazy Unstuffed Cabbage Skillet

I love quick and easy, so naturally I just love this recipe! So much easier than stuffing cabbage leaves. PLUS it’s low carb! You can make rice on the side for those who would like it, but I personally enjoy it without. Hope you all have a blessed day!!

Natural Noshing

I bought a head of cabbage the other day with full intention of making ground meat and rice stuffed cabbage rolls. You know, the ones that are delicately prepared and baked in a tomato sauce and a little time-consuming. A couple days passed and I was running short on time last night and didn’t want to mess with the whole rolling, baking, boiling etc process. I didn’t want to have to freeze the meat to make the recipe at a later date so I came up with plan B – do I get bonus points for being flexible and thinking on my feet?!?

Instead, I made a “lazy girl” version that came out so delicious PLUS it was easy, fast (about 30 minutes total, 20 minutes for simmering) and is versatile. Ground beef was on sale so that’s what I bought but any ground meat would work in this dish…

View original post 411 more words

Mediocre Results…

Last night I decided to do a family favorite but low carb style. Baked Parmesan Chicken and Squash Casserole. I know there are plenty of recipes out there that boast delicious results, this is just my take on two of our faves. With any new food lifestyle there are bound to be recipes that there just aren’t any substitutions for, that’s a sad realization but it’s the truth. Now my own beef with last nights meal was that there was just way too much butter. GASP! I know, but for someone who is trying to minimize her candida issues, there was just too much butter in both recipes. For starters…

IMG_0676

Baked Parmesan Chicken

I basically took our recipe but I modified it to make it more low carb friendly. The results were tasty, tender, but for me too buttery.

10 chicken tenders
1 cup butter
3 garlic cloves, minced
2 cups parmesan cheese
1 tsp dried basil
1tsp dried parsley
1/2 cup almond flour
1/2 tsp black pepper

Preheat oven to 425 degrees. Line baking pan with foil, set aside. Melt butter with garlic on stove top, leave on low. Combine dry ingredients together in a medium bowl. Pat dry the chicken and with a fork, dip the chicken tender in the warm garlic butter. Place into parmesan coating and transfer to baking pan. Repeat for remaining chicken tenders. Any leftover coating should be evenly sprinkled over the chicken, as well as the leftover garlic butter. Bake for 20-25 minutes until golden brown.

Everyone loved this chicken, JJ said it was the best yet because it was so tender and juicy and I will agree with him on that note. I explained to him it was because of the almond flour. Breadcrumbs are dry and tend to suck the moisture out of the chicken. Almond flour on the other hand has it’s own oil and will lend it instead of absorbing the moisture from the chicken. He thought it was pretty cool and really enjoyed it!
It was very parmesany, I’m just thankful for the digestive enzymes I take that helped me through the night. While this was a low carb recipe(@2g net carbs per two pieces), it was a rich recipe and one I won’t be having too often.

Our side dish was flavorful but somewhat disappointing. We’re used to a squash casserole that is creamy with a crunchy cheese topping. That’s not what happened last night. I only ate small spoonful on my salad, burped it for a while afterwards and was concerned it would cause acid reflux later on in the night. It didn’t but I don’t think I’ll be making that particular recipe again.

IMG_0674

Low Carb Squash Casserole

1 medium zucchini, peeled and sliced
1 medium yellow squash, peeled and sliced
1 medium onion, diced
2 Tblsp butter
6 pieces of turkey bacon, chopped
2 cups shredded cheese
salt and pepper to taste
Parmesan cheese for top

Preheat oven to 375 degrees. Peel and slice zucchini and squash into rounds. Set aside. Dice onion and chop turkey bacon, add to a skillet with butter and cook on medium heat until onions are transparent. Add veggies and cover for 10 minutes, stirring occasionally. Season with a little salt and pepper(I did a pinch of each) and transfer to an 8×8 baking dish. Stir in shredded cheese, top with parmesan cheese and bake for 10 minutes.

At 6g net carbs per serving(6 servings) I wasn’t too thrilled with this. Mostly because of how it left me feeling afterwards. Could easily be from all the dairy and turkey bacon. I’m not sure how the rest of the family liked it, didn’t look like too much of it was eaten. I will say this, it needed more zucchini and squash. The cheese ratio to veggies was way off. If I make this gain I will be adding more vegetables and reducing the cheese considerably. Two cups just seems like a lot for so little vegetable content.

I leave it up to you wonderful readers to give these recipes a try, if you do please let me know what you think. If you have any suggestions about how I can improve these two dishes in a low carb gluten–free way then comment below! I look forward to your suggestions!

Have a blessed day!!!

Chicken Parmesan Meatballs(LC/GF)

Afternoon all, hope everyone is having a fantabulous day so far! It’s been a great day here in my neck of the woods. Woke up and I’m down a total of 5 pounds, yes very awesome! I posted on Instagram about how it’s weird but I’m actually thankful that I discovered I have this candida overgrowth. Because of it I am being more mindful of what I put in me and realizing the harm of certain foods. I actually feel so much better! This is week three and while I am still suffering from some lower back pain, some soreness in the backs of my thighs, for the most part I do feel better. More energetic, less fatigued, and my mind is clearer. All pluses that what I am doing is making a difference and that I can never stop.

So, Saturday afternoon I had a fun Jamberry home party with a sweet friend. She and her girls invited their friends and moms over for a few hours. We all had a blast! One of my contributions to the party was to bring safe food that I could eat(and yes she provided tasty treats as well). Of the food I brought, I made chicken parmesan meatballs. Found the recipe over at The Iron You blog, very easy recipe!
I wish these were dairy free so I could have them all the time, but it will just have to be one of those things that I only make on occasion. I doubled the recipe so there would be enough for everyone and instead of having 22 balls I had 60…I think I made them smaller than the recipe says to. My go to meatball maker is a melon baller. It just makes the perfect poppable size for meatballs.

IMG_0394

Chicken Parmesan Meatballs

Yields 60 meatballs

2 pounds chicken, ground
2 cup almond meal/flour + extra in a bowl for coating
1 cup parmesan cheese(I used the powdery stuff in the green container)
1 cup lactose free milk(I could have used unsweetened almond milk but I didn’t)
1 tsp kosher salt(I didn’t alter this since I was adding more parmesan cheese)
1/2 tsp black pepper
1/2 tsp dried oregano
1/4 tsp garlic powder

(There are two different methods to cook these and I wound up using both. I first baked them in a 350*F oven for 25 minutes but they didn’t brown up. So I then put some oil a large skillet and quickly fried them up just enough to brown the outside. You don’t have to bake these first, you can skip that step completely. Just fry them up on the stove top and save yourself any troubles. As for the oil, I would suggest a cold pressed organic coconut oil(the one without the coconut flavor). It’s every bit as healthy and better for you than canola, corn, or peanut. )

Grind up chicken in the food processor, I used chicken tenders you can certainly buy chicken already ground up. Place the ground meat into a large bowl. Add in 2 cups almond meal/flour and remaining ingredients. Using a silicon spatula fold the ingredients together. You don’t want to over mix, that would make the meatballs tough. The recipe states that you roll about 1 tablespoon of the chicken mixture up. I just used a melon baller and made them smaller. Works just as good! Roll each ball in a bowl of extra almond meal/flour and fry up until golden brown, draining on paper towels if needed. Serve with your favorite marinara sauce, homemade ranch dressing, or just eat plain!

These were a hit, everyone enjoyed them and were shocked at how moist they were! When you think of chicken meatballs the thought crosses your mind that they’re going to be dry, tough, something that is going to suck the moisture right out of your mouth. But that’s not so with this recipe!

As soon as I get some more almond meal/flour from Kroger I’ll be making up several batches and freezing them to keep on hand. If you’re just wanting something to use to change up your low carb meals in the mornings or for snacks, then these are the best things to go with. However, if you are suffering from candida overgrowth then it’s best to either steer clear or not indulge too often. You know your body better than anyone else, listen to it and know your limits.

Nutritional Information for 1 meatball minus marinara sauce
(courtesy or My Fitness Pal)–

Calories: 45
Fat: 3 grams
Carbohydrates: 1 grams
Protein: 5 grams
Fiber: 0g
Net Carbs: 1g

Have blessed day!!

Felt Like A Chef Tonight!

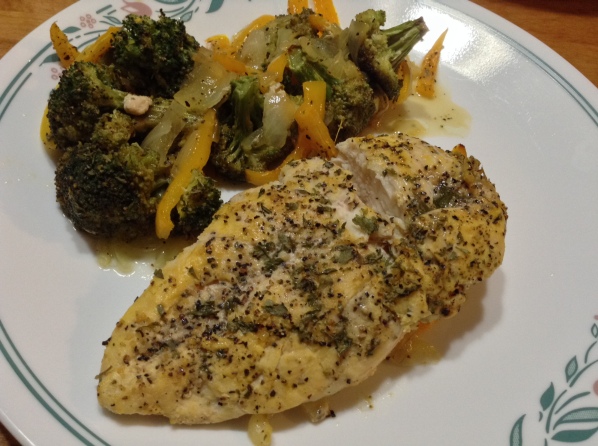
It’s not too often that I cook something that is not only amazing but is crazy easy! But tonight was different, I felt like an chef in the kitchen. I knew I wanted to eat lemon pepper chicken for dinner but what kind I wasn’t sure. So, I did a web search for pan searing and baking in the oven…just that. After reading up on the HOW I got busy applying what I had skimmed over–yes you read that right, skimmed! LOL!

image1(3)

Pan Seared/Oven Baked Lemon Pepper and Garlic Chicken

Serves 2
Prep Time: 5 minutes
Bake Time: 25

2 Tblsp raw organic coconut oil
2 boneless, skinless chicken breasts, thawed
lemon pepper seasoning
garlic powder
pinch of kosher salt
1/2 cup broccoli florets
2 mini sweet yellow peppers, thinly sliced
1/8 cup chopped onion
Healthy pinch dried parsley

Set oven temp to 350*F. Heat up an oven safe pan, I used a heavy copper bottom skillet. Begin heating it up over medium high heat.
Pat chicken dry and rub lemon pepper, garlic powder and salt on both sides of the chicken. Add coconut oil to the skillet and as soon as it’s melted(which doesn’t take very long) add the chicken. Sear for 3 minutes on each side, add in chopped onions, broccoli florets, and thinly sliced mini yellow peppers. Place the pan in the middle of the oven and bake for 25 minutes.
Before serving double check doneness and enjoy!

You can use lemon zest, lemon juice and black pepper for a fresh lemon pepper flavor. Feel free to add whole crushed garlic, and any vegetable combination you like!

According to MyFitnessPal, the nutritional info is as follows:

Calories: 440 kcal
Carbs: 7 g
Fat: 5 g
Protein: 2 g
Sodium: 18 mg
Sugars: 3 g

You can use any oil you like to reduce the fat and calories. I can’t use another except coconut oil at the moment. I am a fan of palm oil, but I’m waiting to get myself some. It’s a crazy easy dish and yet so flavorful! My first bite had my eyes bugging out of my head 😛  Play with the flavors and just have fun!

Have blessed day!!